Sunday, July 30, 2006

A Madness of Mangos (part 1)

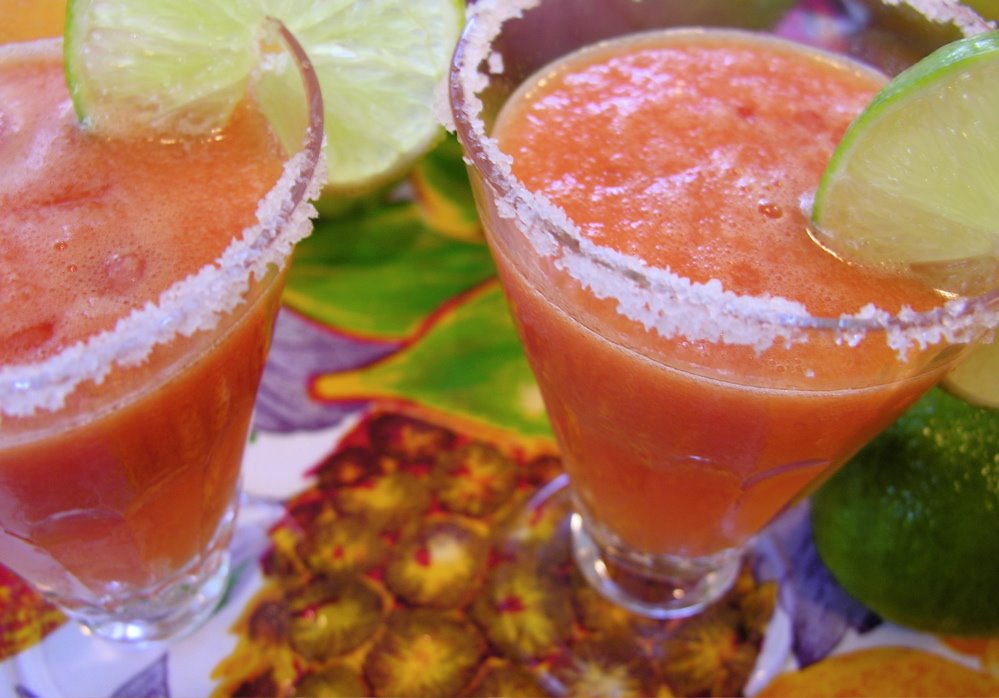
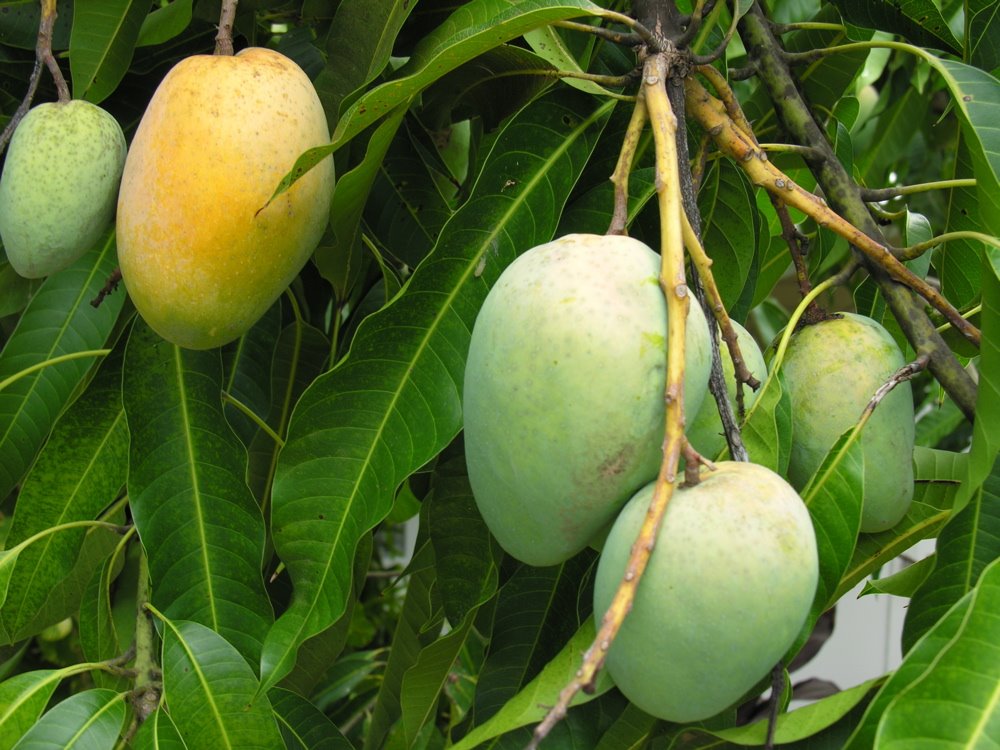
Yes we have mangos today. We are fortunate to have a tree in the yard that likes us. We know this because we were rewarded with a prolific bounty this year. To tell the truth the tree has provided us with mangoes for well over a month, and when they are gone we will miss them. The first ones of the season we ate fresh, the very first one I heralded into the kitchen with great fan fare announcing that we had a ripe mango, thus the season of mangos began. The sweet tart taste of the first mango always brings with it summer memories. Moving on into the season the mangoes ripen in waves of ten to twenty at a time, now our friends and neighbours look forward to suckling on the sweet fruit. Freezing temporarily helps to preserve the bounty, but now the freezer is full and the mangoes keep coming. Smoothies, salsas, mango preserves and fruit salads roll off the tree, and still more mangoes. With the aid of the“Great Mango Book” and the “Trade Winds Cookery” cook book, I managed to open my perception to what Mangos could be. With that stated here are our favourite and most successful recipes of the summer. Just one more thing, when putting your head into these recipes remember that mango is sometimes referred to as the “peach of the tropics”.

Mango jelly, relish and leather are some of the many things we made with our mangos this summer.

Mango-Lime Relish
This recipe is verbatim courtesy of the “Trade Winds Cookery” by Norma Davis copyright 1956. I feel no need to change a thing, this relish is easy to make and complements grilled meats superbly, I even found it to be delicious over plain
white rice.

  • 4 cups green or half-ripe mangoes
  • I cup sweet red pepper, chopped
  • 1 cup onion, chopped finely (* I used a spanish sweet onion, Valdila )
  • 2 cups lime juice
  • 1 cup sugar
  • Salt (* I used one teaspoon)

    Peel and slice the mangoes thinly. Make a syrup of the lime juice and sugar. Add other ingredients and cook until the syrup is thick and the fruit transparent. Seal immediately. Other seasonings can be added as desired. (* I made a batch using whole cloves and whole allspice berries, currently I am wating to see how the flavors meld)

    The Trade Winds Cookery: Tropical Recipes for All America was published in 1956 and was a cookbook designed to bring awareness to foods that were becoming available by means of modern transportation and marketing.

    Mango Leather
    This recipe was adapted from “The Great Mango Book” by Allen Susser
    This tasty treat can be made while you sleep. If you have kids that are interested in cooking, mango leather is easy and fun to make with a minimal amount of mess and results are guaranteed. Please note the changes, ( * designates my changes) I found this recipe has some faults. Mango leather is wide open for experimentation.

    Makes one 14 inch roll, approximately
  • 2 pounds ripe mangos, peeled, cut from the pit, and coarsely chopped (* 2 pounds plus a few ounces is better)
  • 1 tablespoon freshly squeezed lemon juice (*I like a sweet tart taste and use 3 tablespoons of lemon or lime sometimes mixing the two)
  • 3 tablespoons sugar (* this is fine, try dark brown sugar for a different taste)

    Preheat the oven to 225 degrees. (* This is where I get off the bus and leave the author behind. 225 degrees is much to hot. Start your oven at 200 degrees for 2 hours then reduce to 170 degrees for 8 to 10 hours. I have an electric range and this formula works perfect for me)
    In a food processor purée the mangos until smooth. Add the lemon juice and sugar. Puree until the sugar is dissolved.
    Dampen a rimmed pan (*wipe with damp cloth ) and line it with sheets of plastic film large enough to overlap the edges. (*The plastic wrap will not melt, try and keep wrinkles to a minimum)
    Pour the mango mixture onto the lined pan. By tipping and tilting the tray, spread it out into an even layer (*Spread it with a spatula then tap) about 1/4 inch thick.
    Place in the oven for 12 to 14 hours, (* 8 to 10 hours works for me) or until dry but pliable. Remove from the oven and cool. Peel the leather off the plastic film and transfer to a sheet of waxed paper. Roll the leather up into a cylinder. Store in an
    airtight container for up to 2 weeks. (* Peel from plastic while warm and transfer to cutting board and cut into strips with a pizza wheel cutter, wrap in plastic wrap squares and twist ends)

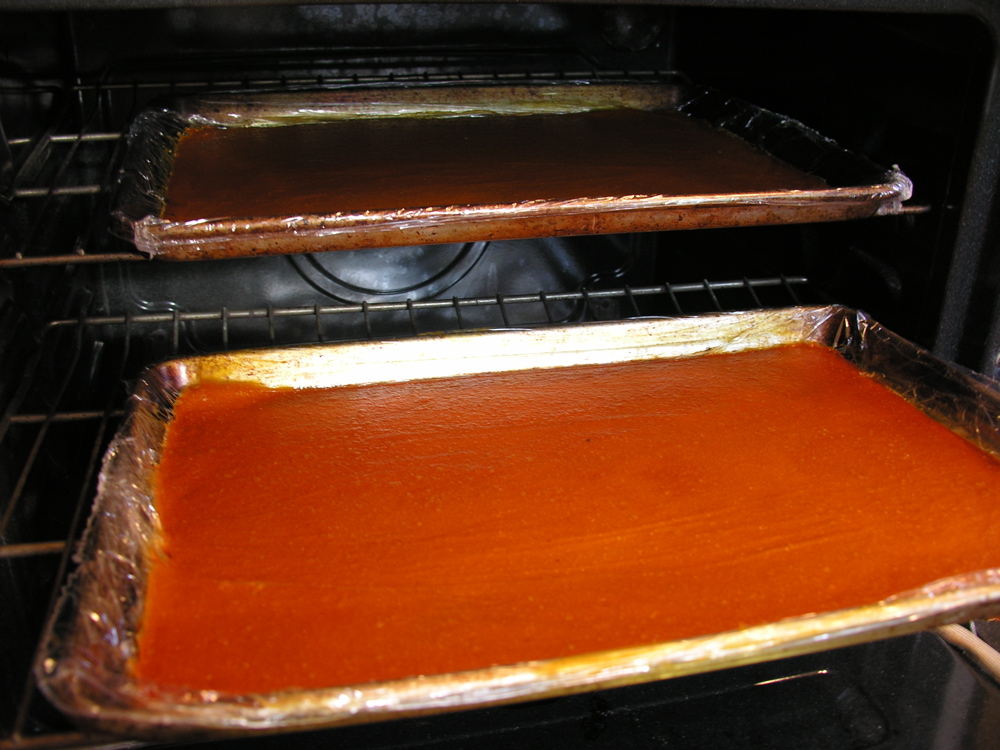
    Finished mango leather coming out of the oven

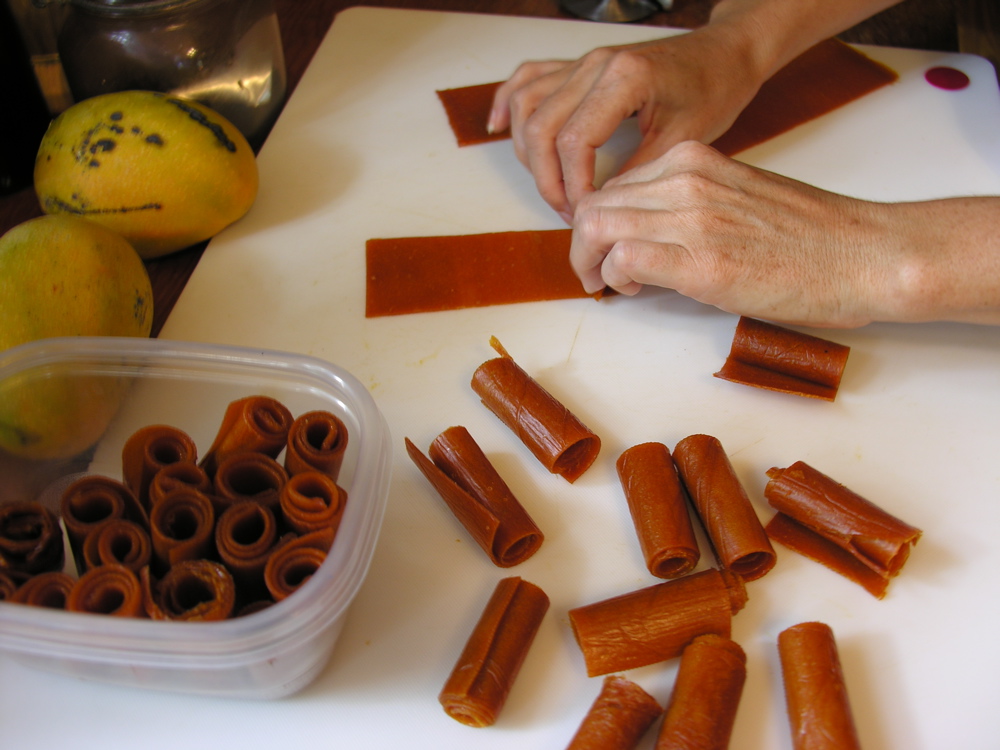
    Cutting and rolling the warm strips

    Additional cooks notes:
    The taste, texture, chewiness of the leather can be adjusted to your preference. The first time I made mango leather I used the recipe in the Mango book, following the instructions for 225 degree temperature at 12 hours, I ended up with mango brittle. I have since found that when the time and temperature are reduced the fruit retains more of its flavour and a soft body. To say it another way, the lower temperature results in a mango leather of surprising succulence. You do want the finished leather to be dried out enough to be peeled off the plastic wrap in a single sheet. To test for doneness peel from one end, the leather should not tear as you do this. Transfer to a cutting board and with a pizza wheel cutter divide into strips to suit your needs. Roll up strips and then wrap individually in wax paper. The author claims that the leather will keep for two weeks, if you can resist it!


    A Successful Variation; Mango Coconut, Rum Leather

  • 4 pounds plus mango flesh
  • 4 tablespoons dark brown sugar
  • 6 tablespoons lime juice
  • 2 cups bakers shredded sweetened coconut
  • 2/3 cup Captain Morgans Spiced Rum

    Purée mango in batches in food processor with sugar, lime juice and rum
    Press through kitchen strainer into large bowl.
    Add coconut flakes a little at a time stirring to mix throughout.
    Divide between two plastic wrap lined baking sheets.
    Start the leather at 200 degrees for 2 hours.
    Reduce temperature to 170 degrees for 8 to 10 hours.
    Peel off plastic wrap cut roll and wrap individual pieces with wax paper.
  • A Madness of Mangos (part 2)

    Country Mango Tarts
    Adapted from “The Great Mango Book” by Allen Susser
    A person could get rich selling these delightful rustic tarts, no special pans just fold the dough edges up and over the mango slices.

    Pastry Dough
  • 1 1/4 cups unbleached all-purpose flour
  • 2 tablespoons sugar
  • 1/4 teaspoon fine sea salt
  • 1/2 cup (1 stick) cold unsalted butter, cut into
  • 1/2-inch dice
  • 4 ounces cold cream cheese, cut into 1/2-inch dice
  • 2 teaspoons freshly squeezed lime juice
  • 1 tablespoon ice water

    Fruit Preparation
  • 6 tablespoons sugar
  • 2 large ripe mangos, peeled, and cut from the pit
  • 2 tablespoons freshly squeezed lime juice
  • 1 teaspoon minced fresh ginger
  • 2 tablespoons milk
    Cooks note: I also added a 1/4 teaspoon cinnamon

    To make the dough: In the bowl of an electric mixer ( Cooks note: I used a hand held mixer with beaters, no problem) fitted with a paddle, combine the flour, sugar, and salt. Mix on low speed until blended. Add the butter and cream cheese and
    mix on medium speed to a pebbly consistency. Add the lime juice and water; continue to mix just until the dough forms into a ball. Transfer to a lightly floured surface. Cut into 6 equal pieces and shape each into a disk. Transfer to a plate, cover with plastic wrap, and refrigerate for 30 minutes, or until firm.

    Preheat the oven to 400 degrees. Remove the dough from the refrigerator and let stand for 5 minutes. Roll each disk into a 6-inch-diameter round and place the rounds on a parchment paper-lined baking sheet. Brush the pastry dough with milk and sprinkle with 2 tablespoons of the sugar.

    Cut the mangos into 1/4-inch thick length wise slices. In a medium bowl, carefully mix together the mangos, lime juice, the remaining 4 tablespoons of sugar, and the ginger. Arrange the mango slices on each pastry round, leaving a 1-inch border.
    Fold the edges of the pastry over, pleating as you go.

    Bake for 15 minutes, or until the edges of the pastry and the mangos are both golden brown.

    Indian Mango Ice Cream
    Once again I credit “the Great Mango Book” by Allen Susser.
    I must give Allen his due, “this is by far the most comprehensive and useful book on mangos that I have found thus far. It will take me at least three more seasons of mangos to try all of the recipes found here.


    “Indian-style ice cream, called kulfi, is a creamy, rich, still-frozen dessert that is traditionally served in small, conical shaped aluminium moulds. You can use ramekins or custard dishes instead. - Allen Susser.”

    Serves 4
  • 6 cups milk
  • 2/3 cup sugar
  • 1 1/2 large, ripe mangos, peeled, cut from the pit, and sliced
  • 1/4 cup pistachio nuts, coarsely chopped

    In a medium, heavy saucepan, bring the milk to a boil over high heat. Decrease the heat to very low and simmer until the milk is reduced to 1 1/2 cups, stirring constantly for the first 15 minutes and then at 2 to 3 minute intervals. Take care that the milk does not scorch on the bottom or boil over; adjust the heat accordingly. Add the sugar and stir until dissolved. Remove the pan from heat and let cool completely.
    In a blender, puree one third of the mango until smooth. Measure 1/2 cup of the mango puree and add to the milk mixture. Mix well, and stir in the pistachio nuts. Pour into six 4-ounce ramekins or custard dishes and freeze for about 5 hours, or until firm.
    A few minutes before serving, remove the moulds from the freezer. Dip the bottom of each into a bowl of hot water for a few seconds and invert and unmold onto a dessert plate. Serve garnished with the remaining mango slices.

    Cooks notes:
    Before attempting to boil the milk be ready to stick with it, never stop stirring! I used five small “Glad Ware” reusable plastic storage containers ( 1/2 cup size ) to freeze my Kulfi. Because of the flexible nature of the container it is easy to unmould the kulfi, and unlike ramekins or custard dishes they have a snap on cover. The added bonus of the covers allow you to run the kulfi under warm running water when unmolding. The lids provide for fresh tasting kulfi even after several weeks in the freezer. The some what conical shape gives height to the presentation and aims to be more traditional. My wife and I both agreed that some extra salted pistachio nuts helped to balance out the sweetness of the kulfi. My last recommendation is to serve with fresh mango slices, not only does it look pretty the combination is divine.


    Close To Heaven Watermelon Mango Margarita

    Imagine, tender corn on the cob slathered with butter, toasted buns piled high with pulled Bar-B-Q pork sweetened with plenty of dark molasses sauce, all washed down with several “Watermelon Mango Margaritas”. A meal like that and the angel you married sitting by your side, why if that's not close to heaven it must be heaven on earth! Even If you don’t exactly agree with my definition of heaven, I am sure you are going to love this twist on a classic drink. Don’t forget the salt and DON’T OVER SUGAR or you will end up with something more like a daiquiri. Come on you guys, treat your lady right, mix the margaritas for her.

    Watermelon Mango Margarita
    This recipe comes via the our local news paper giving credit to the National Watermelon Promotion Board

  • 2 cups chopped seedless watermelon
  • Flesh of 1 ripe mango (medium size)
  • Juice of 2 fresh limes (or 3 small limes)
  • 1 teaspoon sugar (note the original recipe call for 1 tablespoon but that is not necessary if you have sweet fruit )
  • 1 tablespoon triple sec
  • 2 jiggers tequila (a jigger is about 1 1/2 ounces or just under 1/4 cup)
  • 2 cups ice (you decide - if you have chilled fruit no t as much ice will yield a richer drink )

    Place all ingredients in a blender and puree until smooth, yields 3 to 4 good size drinks.
  • Thursday, July 27, 2006

    A Madness of Mangos (part 3)

    Shrimp & Mango Cocktail
    This recipe is adapted from “Best of Salads and Buffets” a 1983 paper back printed by HP Books
    Serves 4


  • 2 mangoes
  • 1 red bell pepper
  • 1 pound small to medium shrimp
  • 3 tablespoons mayonnaise
  • 1/3 cup dairy sour cream
  • 1 teaspoon sugar
  • 1 teaspoon lemon juice
  • Few pickled green peppercorns or freshly ground black pepper
  • 1 tablespoon grated fresh horseradish or prepared creamed
  • horseradish
  • Few mint leaves, if desired

    Cut each mango in half lengthwise. Remove seeds; discard. Scoop out flesh to within 1/4 inch of shells; finely dice flesh. (1) Cut bell pepper in half; place under broiler until skin breaks. Peel off skin and remove seeds. Slice pepper in thin strips. Peel raw shrimp and cook in boiling water seasoned with “Old Bay Seasoning” for one minute. Drain but do not rinse, chill in refrigerator. In a small bowl blend together mayonnaise, diced mango, sour cream, sugar lemon juice, green peppercorns (2) or black pepper, horseradish (3) and shrimp (4). Spoon mixture into mango halves. Top with strips of red pepper. Garnish with mint leaves, if desired.

    Cooks notes; (1) I had a tough time getting the pit out and useable chunks of mango for the salad. I resolved this by cutting up an extra mango or two cutting the meat from the pit then dicing it for the salad. I reserved the flesh scraped with a spoon from the shell for a smoothie. (2) can be omitted. (3) The horse radish is somewhat germanic in taste albeit an interesting combination, you may prefer to keep this more latin in flavour and a pinch of ground red pepper or some cut up jalapeño could do nicely. (4) It may not be necessary to add all of the mango chunks or the shrimp, keep adding and tossing untll all is nicely coated in the dressing. One thing for sure, if your a shrimp lover you are going to love this!

    Thai Steak and Mango Salad
    Adapted from “The Great Mango Book” by Allen Susser
    Serves 4


  • 3 cloves garlic, minced
  • 10 sprigs cilantro, stemmed (reserve stems)
  • 1 teaspoon kosher salt
  • 1/2 teaspoon freshly ground black pepper
  • 3 tablespoons peanut oil (canola oil works as well)
  • 12 ounces sirloin steak, trimmed of fat
  • Inner leaves from 1 small Bibb lettuce, washed and dried
  • 1 small, firm, ripe mango, peeled, cut from the pit, (any sweet “firm” mango will do, add as much as you like)
  • cucumber, peeled, seeded, and diced
  • 4 large green onions, including light green parts, diced

    dressing
  • 2 tablespoons Thai fish sauce (also know as nuoc mam, our favorite is Golden Boy Brand)
  • 2 tablespoons freshly squeezed lime juice
  • 1 tablespoon soy sauce
  • 2 teaspoons minced, fresh red Thai or jalapeno chili
  • 2 teaspoons packed brown sugar

    In a food processor, combine the garlic, cilantro stems, salt, pepper, and 2 tablespoons of the oil. Pulse to make a smooth paste. Spread the paste on both sides of the steak. In a large, heavy skillet, cook the steak 3 to 4 minutes on each side for medium rare. Remove from the pan and let cool. Cut the steak into thin strips.
    Divide the lettuce leave: long 4 plates and arrange the mango, cucumber, green onions, and strips of steak on top. make the dressing: In a small bowl, combine all the ingredients and stir until the sugar is dissolved.
    To serve, drizzle the salad with the dressing and scatter the served cilantro leaves over the top.

    Cooks note: The Author states that texture plays a predominate role between the crisp green mango and the tender sirloin steak. I find that a frim ripe “green” mango is usually on the tart side, indeed it is crunchy but the real play in this salad is with a firm sweet mango thats toys in your moth when it hits the salty fish sauce. I do love the way the author uses the cilantro stems, now that is a idea that made me sit up and think.

    Mango Vinaigrette
    Adapted from “The Great Mango Book” by Allen Susser
    Makes 3 cups


  • 1 medium ripe mango, peeled and cut from the pit
  • 2 tablespoons minced fresh ginger
  • 2 tablespoons freshly squeezed lime juice
  • 1/4 cup rice vinegar (I prefer white wine vinegar)
  • 1 small red bell pepper, seeded, deribbed, and diced
  • 1 small red Thai chile, seeded and minced (can be omitted or use jalapeño chili)
  • 1/4 cup minced fresh cilantro
  • 1/4 cup canola oil
  • 2 teaspoons kosher salt
  • 1 teaspoon freshly ground black pepper

    Cut one half of the mango into 1/4-inch dice. Chop the other half and remaining flesh coarsely. In a food processor, combine the chopped mango, ginger, lime juice, and vinegar. Process until smooth.
    In a large bowl, combine the mango puree, bell pepper, chile, and cilantro. Gradually whisk in the oil to make an emulsified sauce. Stir in the salt, pepper, anddiced mango. The vinaigrette will keep, covered and refrigerated, for 2 to 3 days.

    Cooks notes: As the author “Allen Susser” states this is a refreshing dressing for a summer salad. We composed our salad by sauteing some bay scallops, toasting some pine nuts, crumbling up some fete cheese and diceing up an extra mango. All nicely arranged and top with the vinaigrette. Other salads using grilled shrimp or chicken would be well served with this vinaigrette.
  • Wednesday, July 12, 2006

    Fava Follow Up

    I have decided to post a no recipe follow up to our previous post “The Transcendent Fava.”

    My fervour for beans lead me to review the story of “Jack and the Bean Stalk”, I had forgotten about the voracious appetite the giant had, and I learned that the version I was familiar with was the tamed down “no nightmares” childhood one. To refresh your vision of “Jack and the Bean Stalk” and to make for some lively dinner conversation visit D.L. Ashliman’s folk texts . If you have read this far, you are on your way to becoming a fava bean aficionado, congratulations, read on. No discussion on fava bean is complete without a mention of the movie “Silence of the Lambs” and the famous line spoken by the character Hannibal Lector, “I ate his liver with some fava beans and a nice Chianti.” Some of you may want a tee shirt depicting Hannibal and his love for favas..
    Bon appetito!
    Related Tags: , ,

    Sunday, July 09, 2006

    The Transcendent Fava Bean

    If Jack from the tale “Jack and the Bean Stalk” had not traded the family cow for a few beans his life would have remained impoverished. No sack of gold, no hen to lay the golden eggs, no gold singing harp and finally no marriage to a great princess. Beans provide for some nice perks and that is what I hope to convince you of. For me the “Queen Bean” is the Fava, so much so when I see fresh Favas I get excited enough to make proclamations to the produce staff at our local Publix market. I admit to having said “These beans are like eating poetry”, “Favas make a dish fit for kings and beggars alike”, “ A mouthful will stop time.” With wide eyes and speechless lips they eye the unfamiliar bean not knowing what to say in reply. I load my cart with the large green lumpy pods, priced at $1.99 a pound and feel as if I have just won the lottery. So if you want to live happily ever after read on.

    Some Basic Facts;
    Fava beans have been on the menu for 9000 years, first appearing during Neolithic times in the Middle East. Fava beans are well travelled and now appear world wide except in the lowland tropics. It is important to note that a small minority of people in certain populations (usually of Mediterranean extraction) have a negative reaction to favas known as “favism”, on the other side of the coin favas are being studied as a way to control the symptoms of “ Parkinson's Disease”. There is much information to be found on the internet, the “Long History of the Mysterious Fava Bean”is a good place to start. Some years ago I purchased “A Gardeners Guide To Fava Beans” by Ianto Evans. A little pamphlet publication published by a group know as the “Fava bean project” is a good reference. It includes some recipes and information on how to grow favas. It may be helpful if you can find it, I have not been able to locate a source.

    Initial Preparation;
    Fava beans come both fresh and dried and the month of June is the time to find the fresh ones. The season for fresh favas is early spring to early summer, I most recently had them on the Fourth of July. Preparation for fresh favas is a two step process. Like English Peas they need to be shelled, if you are not dealing with a bushel this is relaxing to do. Once out of the pod the beans should be blanched in boiling water for one minute to loosen the skin around the bean, then drained and cooled in an ice bath. The outer husk can be removed by pinching the edible bean out of the husk, for me this involves making a small cut with my thumb nail then squeezing out the bean using thumb and fore finger. The beans are so beautiful the process becomes zen meditation, something to be enjoyed.

    Pinching and squeezing the bean.

    Fresh Favas Sautéed in Olive Oil with Garlic
    Not much to explain here. Use a good oil with flavor, fruity or spicy, a clove of garlic, more for garlic lovers. Slowly sauté the beans for 10 to 15 minutes stirring often. Season with salt to taste and add a squeeze of lemon juice if desired. For a slightly different flavor add either a small quaintly of minced pancetta or prosciutto along with the garlic and olive oil.

    Favas with Pasta
    The recipe comes with some adaptation from the pages
    of “The magazine of La Cucina Italiana” May-June 2006.

  • 2 tablespoons butter
  • 2 garlic cloves, thinly sliced
  • 12 ounces fresh fava beans, prepared (more is better!)
  • 2 tablespoons pine nuts, lightly toasted in a fry pan
  • 1 1/2 cups mache (also known as lambs lettuce) washed and drained. In my opinion chopped escarole would be a good substitute.
  • freshly ground pepper

    The magazine gives directions for making a hand made fresh pasta called “Trofie” little twists of pasta. If making your own pasta is something you have time for it will improve the texture and flavor of this dish. My personal preference for this dish is to keep the pasta delicate, whether fresh or dried. We used a pasta made by the Alessi company, called “Casarecci.”

    Start your pasta water, once boiling add salt and dried pasta. In a skillet (large enough to accommodate the pasta) melt the butter add the garlic and sauté until golden, add the favas and the pine nuts and sauté for 3 to 5 minutes. (if using fresh pasta cook after sauce is made) Drain pasta add to the skillet with the mache, cook until the lettuce is wilted about 1 minute.

    *Cooks note; I like to add additional butter along with a tablespoon or two of pasta water making the sauce looser and richer. Season with salt and pepper, toss well, pass Parmigiano-Reggiano at the table.

    Risotto with Fava Beans and Fennel
    Risotto con fave e finocchio

    Recipe adapted from “A Fresh Taste of Italy” by Michele Scicolone. *I highly recommend this book, with more than 250 recipes it covers the basics to specialities, clearly written and accessible to any one who has just a spark of interest in Italian cuisine.

  • 1 1/2 pounds fresh fava beans, or 1 1/2 cups frozen fava beans, blanched and peeled.
  • 1 large fennel bulb (1 pound)
  • 2 tablespoons salted butter
  • 2 tablespoons olive oil
  • 1/4 cup finely chopped green onions
  • 2 cups medium-grain rice such as Arborio, Carnaroli, or Vialone nano
  • 6 cups hot home-made chicken broth or a combination of half canned broth and half water
  • salt and freshly ground pepper, to taste
  • 3/4 cup freshly grated Parmigiano-Reggiano.

    Shell the fava beans then peel off the thin skin that covers each bean. You should have about 1 1/2 cups.

    Trim off the dark green feathery leaves and stalks of the fennel down to the rounded bulb. Cut a slice off the stem end with a vegetable peeler, trim away any brown spots or bruises. Cut the fennel length wise into quarters, then crosswise into thin slices.

    In a large heavy saucepan melt 1 tablespoon of the butter with the olive oil over medium -low heat. Add the green onions and cook until tender, about 3 minutes. Add the fennel and cook for 10 minutes, stirring occasionally.

    Raise the heat to medium high. Add the rice and cook stirring constantly for 1 to 2 minutes, until coated and shiny. Add about 1/2 cup of the broth. Cook, stirring constantly, until most of the liquid is absorbed. The spoon should leave a wide track on the bottom of the pan yet there should be liquid surrounding each grain.

    Continue adding the broth about 1/2 cup at a time, stirring after each addition. Adjust the heat, if necessary, so that the liquid simmers rapidly, but the rice does not stick to the bottom of the pan.

    After 15 minutes, stir in the fava beans. Add salt and pepper. Continue adding broth 1/2 cup at a time and stirring until the rice is tender yet firm to the bite and a creamy sauce forms around the rice and vegetables. Use only as much of the liquid as necessary. If you run out of broth, switch to hot water. Remove from heat.

    Vigourously stir in the remaining butter and cheese. Serve immediately.
    *Cooks note: I always add some of the broth at the very end if necessary to give the creamy consistency if the rice is too sticky.

    In the “Chez Panisse Vegetables” cookbook by Alice Waters, we found a nice selection of fava bean recipes including a purée, a soup and a dish with artichokes all are worth exploring.
    Related Tags: , , ,
  • Sunday, July 02, 2006

    Some Fish’n Favorites

    If you find our blog recipes to be without a theme, eclectic in nature, we promise you will find they all have one thing in common and that is great taste. Out of all the things that I attempt to prepare, I find fish and shellfish to be the most difficult. I love the taste of deep fried seafood, but have come to realize fish and shellfish deserve to have their delicate nuances of flavor preserved for the table. This challenge has lead me to try many varieties and preparations, from poaching and saucing to mousses. The two recipes represented here reward the chef in their ease of preparation and their delivery of comfort and flavor.

    adapted from the book titled “A taste of the Gulf Coast” by Jessie Tirsch
    Verona Watson’s Scallop Bake
  • 2 pounds bay or sea scallops (cut sea scallops into quarters)
  • 2 large egg yolks
  • 1/4 cup heavy cream
  • 2 tablespoons dry white wine
  • 2 teaspoons freshly squeezed lemon juice
  • 2 tablespoons minced onions
  • 1 1/2 teaspoons salt, divided
  • 1/4 teaspoon ground white pepper
  • 1/8 teaspoon ground ginger
  • 1/2 cup fresh breadcrumbs
  • 1/2 cup freshly grated Parmesan cheese, divided
  • 4 tablespoons unsalted butter, melted
  • 2 tablespoons chopped fresh parsley,
    preferably Italian ( flat-leaf )

    Preheat the oven to 450 degrees. Place 8 scallop shells or ramekins on a baking sheet and distribute the scallops evenly among them. In a bowl, beat the egg yolks and whisk in the cream, wine, lemon juice, onions, salt, pepper, and ginger. Divide among the scallop dishes. Combine the breadcrumbs, 6 tablespoons of the Parmesan, the melted butter, and parsley, and sprinkle this mixture evenly over the scallops. Sprinkle the remaining 2 tablespoons Parmesan over the tops and bake until brown and bubbly, 16 to 18 minutes.

    Cooks note: I replaced the white wine with a dry vermouth.


    adapted from the book titled “The Great Book of Seafood” Giuliana Bonomo
    Sailor’s Pie
  • 1 lb fillets of hake or cod
  • juice 1/2 lemon
  • 10 ounces floury potatoes
  • 1/2 cup mitk
  • 3 tbsp butter
  • 1 1/2 tbsp béchamel sauce
  • breadcrumbs
  • salt

    Wash the fish, drain, and poach for 10 minutes in 2 1/4 cups water with a little salt and the lemon juice. Leave to cool in the liquid and then drain. Remove any remaining bones, reduce to a purée in the food processor, and transfer to a bowl. Boil the potatoes in salted water for 30-40 minutes; drain, peel, and mash while hot. Work the potatoes into the fish, add the hot milk, the butter cut into small pieces, the bechamel sauce, and a little salt. When well blended, grease a deep cake pan (8-9 in in diameter) with butter, sprinkle the Inside with breadcrumbs and fill with the fish mixture. Top with a layer of breadcrumbs. Place in a preheated oven at 400 degrees for 10-15 minutes. Brown the top under the broiler for 2 minutes. Leave to stand for a minute before serving.

    Bechamél Sauce
    Make the bechamél sauce: put 1/2 pint milk into a small saucepan, add 1 peeled, sliced shallot (or small onion), 1 chopped carrot, 1/2 stick celery, chopped, 1 bay leaf, and a few peppercorns. Bring to a boil, remove from the heat, and leave to infuse for 15-20 minutes. Strain the milk and discard the flavorings. Melt 1 oz butter in a clean saucepan, stir in 4-5 tbsp all-purpose flour and cook the resulting roux for a few minutes. Gradually add the flavored milk and bring to a boil, stirring
    constantly. Cook for a further minute or two until thickened.

    Cooks notes: I used russet potatos.

    Related Tags: , , , , , , , , ,
  • Saturday, July 01, 2006

    “Holy Pasta!”and Shrimp

    Timpano del Cardinal Alberoni? Obviously a man with two loves, God and food. Checking the computers translator I found timpano to mean ear drum. Another source provided timpano as the late 19th century Italian spelling for drum, timpani drums, better known as kettle drums, usually played in an orchestra. So the cardinal must have had a well rounded belly and this dish may have been his favourite way to fill his drum. The man of god was not wrong, this is nice full flavoured pasta dish. Read through the recipe to wet your appetite. At the bottom are some thoughts of my own, cooks notes that may be helpful. I must confess we had this dish only hours ago and I have made it just once and thought it worth sharing.

    Timpano del Cardinal Alberoni
    Baked Macaroni with Shrimp

    This recipe is based on the one collected by Anna Del Conte in her book titled Gastronomy of Italy.
    serves 9

  • 3 cups very finely sliced mushrooms
  • 8 tbsp. butter
  • salt
  • 1 cup shelled shrimp
  • 2 tbsp. brandy
  • 1/2 cup freshly grated Parmesan cheese
  • béchamel sauce made with 11/2 cups milk, 2 tbsp. butter and 3 tbsp. flour, flavored with a pinch of nutmeg
  • freshly ground black pepper
  • 12 oz macaroni or penne

    Sauté the mushrooms in 1/4 cup of the butter for 5 minutes. Sprinkle with salt and set aside. Heat half of the remaining butter in a sauté pan, add the shrimp and gently fry for 2 minutes. Pour over the brandy, set alight and then add half the Parmesan. Keep warm. Make the béchamel in the usual way and then mix in the rest of the cheese. Preheat the oven to 400 degrees. Cook the pasta in plenty of boiling salted water. Drain when very al dente. Butter a deep ovenproof dish and cover the bottom with a layer of pasta. Spread a few tablespoons of the mushrooms and the shrimp over it and add some pepper. Repeat these layers ending with the pasta. Melt the remaining butter and when a beautifully nutty color, pour over the. Spread over the béchamel and bake for 20 minutes. Allow to stand for 5 minutes before serving.

    Cooks Notes: The shrimp used in the original recipe must have been on the small size to fit in a cup. I used medium shrimp and doubled the quantity, every one goes for the shrimp and it is nice to see them whole when on the plate.

    I will accept the fact you know how to make a béchamel sauce, here is how I enhanced it. Flavor your milk with one thinly slice carrot, one sliced shallot, a pinch of nutmeg, three or four peppercorns and the raw shells from half of the shrimp. Strain this before you add to the butter flour mixture.

    I used baby Portobello mushrooms pre-slice for connivence. I Think next time I might add a few dried Porcini but not many as they have a pronounced flavor.

    Save any juices that collect from the shrimp and the mushrooms you can add a bit to the dish as you layer it.

    Don’t try cutting back on the butter it is the correct amount. I did add more fresh nutmeg to the béchamel.

    Call me what you want, but I associate elbow macaroni with “mac and cheese” and find it heavy so I used Barilla brand “Pipettes” a lighter weight shell type pasta.

    Our liquor cabinet lacked brandy so I used Cognac with flaming results.


    Related Tags: , , , , ,
  •